What to do with glue squeeze-out - when should we remove it?


Ask three or more woodworkers the above question and you'll probably get three different answer: right away, after a few minutes and after the glue had dried. Chances are equally good that the person who gives you any of the three answers will have a rationale that seems plausible. In short, the subject of glue squeeze-out is one that's sure to generate some good discussion among anyone who has worked with wood.


Whenever you clamp two pieces of wood together with glue in between, you're dealing with variables in clamping pressure, consistency and amount of glue and species of wood. All of these factors can affect the amount of adhesive that may ooze out of the joint, as well as the technique you use to remove it.


Some Squeeze-out is Good

A little glue squeeze-out — a few tiny droplets or dribbles along the joint — is a sign of a good glue application job. No squeeze-out means you might have applied too little glue, creating a "starved", potentially weak joint. All the experts agree on this point.


Glue squeeze-out becomes a problem only if you can't com¬pletely remove all the excess glue from the wood surface. Any glue that remains on or in the wood fibers can hamper application of finishing material. You know you must remove all the glue that gets squeezed out from the joint, but when and how?


Generally, we don't advise waiting until the glue has dried hard. Note the "generally." Sometimes, you might be able to estimate your glue needs exactly and get just a few tiny beads of glue squeeze-out. If you have no more than this, you can wait till the glue has dried and flick off the beads with any sharp tool.


But, as was mentioned earlier, you could be making a serious mistake in trying to limit glue squeeze-out to so small an amount. Remember the starved joint.


The other extreme is no better. If so much glue oozes out that you'd need a chisel or lots of sand¬paper to remove it after it hardened, you're in trouble. Since the completely dry glue is quite likely harder than the grain of the surrounding wood, the adhesive you cut away might take some wood along with it. And if you use a sander, you risk sanding away too much of the wood.


No Water Is Better

We agree to disagree somewhat with both Snider and Duncan regarding use of a damp sponge or rag. We're convinced that the combination of moisture and pressure can indeed push some glue into the pores of the wood. Sanding will remove the glue at the surface, but perhaps not all the glue that was forced down deep. Why take a chance and wait maybe a couple of days for the wood to reach an equilibrium state before you can sand off the residue?


Let Glue Gel

Clean up excess glue after it has gelled a bit but before it has hardened. Follow Snider's advice and wait 5 to 10 minutes (or longer) after clamping. At this point you'll be able to slice away the "cottage cheese" with a dull chisel or other type of scraper.


Scraping the glue off after it has set for a few minutes makes sense. It's sort of a compromise between removing it right away and waiting until it's completely dry. Of course, once you remove the skin that's formed on the surface of the glue, the glue underneath is still wet. But removing it at this point keeps you from smearing the glue all over quite as much. And by removing as much as you can in this way, you minimize the sanding you'll have to do once the remaining glue has hardened.


How To Avoid Excessive Squeeze-Out


• Check that joint parts fit well by clamping together before gluing. Open pores of wood by sanding.


• Use a brush about the same width as the wood to spread glue. Glue directly from a squeeze bottle should be applied in zig-zag lines to both surfaces, then the pieces rubbed together to distribute.

• It's best to apply glue to both surfaces thinly and allow to par¬tially set before joining pieces.

• Check drying or "set" time of glue you're using. Some set up faster than others. Work to the pace of the glue.

• Don't apply too much clamp pressure. The object is to create a thin film of glue between parts. Too much pressure will squeeze the glue out, resulting in a starved joint. Usually, finger tight will do.

Paste stain and varnish - best way to finish your woodworking project?

No question about it - if you want the toughest possible clear finish on a project, polyurethane varnish is the way to go. It's hard, lustrous, and impervious to alcohol and water. But it is some trouble to apply. You have to mess up a brush, worry about runs and sags - and then there's the dust problem.

Paste varnishes and their companion products, paste stains, avoid all these problems while still giving you all the advantages of a polyurethane finish. I've been seeing them in the woodworking catalogs, and decided to order some to give them a try.

I made up some wood samples - hunks of oak, maple, and pine - and applied the stain and varnish according to the directions. For comparison, I also finished a sample in satin polyurethane - brushed on.

The paste varnish is simple to apply. You just wipe them on with cheesecloth, applying a light, smooth coat. The stains I tested is just as easy. It goes on smoothly and cover evenly. Between coats of varnish, I buffed off the samples with steel wool, then wiped on a second coat.

In our dusty shop, the paste varnishes came out as smooth as a carefully applied brushed-on and hand-rubbed finish. The brushed-on polyurethane, on the other hand, was full of dust.

There was some variation in the degree of yellowing or warm tone the varnish gave to the wood. After the samples were thoroughly dry, I gave each a coat of paste wax. Then, to test them for durability, I dribbled both water and alcohol on all the samples, letting them stand until dry.

This torture test did show up some differences between paste varnish samples and the brushed-on polyurethane. There was some slight discoloration and grain rising on the paste varnish samples, while the brushed-on polyurethane wasn't affected at all.

However, the paste finishes were easy to repair. To patch them, I buffed all with steel wool and applied another coat of wax. I could still see very faint traces of raised grain in all samples after rewaxing, but nothing that couldn't be lived with. All in all, I'd have to rate the paste finishes as being tough and easy to care for.

A distinct advantage of the paste varnishes is that the finish itself is very thin, without much buildup. This gives that hand-rubbed look without all the elbow grease. The cost of the paste varnishes and stains is in the same ballpark with brushed-on varnish, and a little seems to go a long way. Another plus is that paste varnishes and stains are virtually odorless.

My advice - give them a try! I think you'll agree that paste varnish and stain solve a lot of finishing problems.

Oak - one of the best hardwood in woodworking

Brief History of Oak

The Greeks and Romans used oak to construct their seagoing vessels because of its strength, toughness, and durability. The Saxons in England fattened their hogs with acorns, and ground the acorn for use as a seasoning. During this same period, landowners used the acorn as part of their daughters’ doweries.oak best hardwood in woodworking


In Europe, many great halls and castles were paneled with oak wain scoting and almost all furniture there was made of oak.


Today, the oak provide; food, tanbark for tanning leather, dyes, ink, even commercial cork.


Oak Wood Identification
Though there are 14 oak species of commercial importance grown in the U.S., they're marketed either as red oak (Quercus rubra) or white oak (Quercus alba).


Red oak has a pinkish red cast to it, large pores (you can blow smoke through one end of a piece of red oak and it will come out the other), and is quite hard.


White oak, on the other hand, is a tannish brown wood, has smaller pores, and is somewhat harder than red oak.


Woodworking Properties
Both red and white oak are moderately stable before and after working, and both work well with hand and power tools. Because white oak contains an abundance of tylosis (a membrane that seals cells), it is waterproof. Oak accepts finishes well. With built-up finishes, you may want to use a paste filler to fill the pores. This isn't necessary with oil finishes.

Uses in Woodworking
With these woods, the list goes on and on. You can use them for furniture, flooring, interior trim, paneling, turning, carving, and woodenware. White oak has two other important applications. It's highly prized as a material for making barrels and other watertight vessels, and it's one of the best woods for steam-bending wooden furniture parts.


Cost and Availability
One of the most commonly available of all woods, oak falls into the medium price category, with white oak somewhat higher than red. You can purchase oak in several different forms: lumber, plywood, interior trim, flooring, turning blanks, and veneer.


Source of Supply
Over 50 percent of the oak logged annually comes from the southern states. However, if you can get hold of some that's been grown in the Appalachians or the northern states (it's sold as northern oak), buy it. Because it grows more slowly than southern oak, it has a finer texture, more uniform color, and it works better.

Things to check out as you shop woodworking tools

Chances are you won't actually use the tool before you buy it, but you can learn a lot about it while at the store. Try changing bits. Is it easy to get your wrench on the collet nut or does the bases interfere? Does the collet let go of the bit with a single turn of the wrench, or does it take two or three bites? Does the router have a flat top so you can stand it on its head for bit changes?
Check the switch? Is it easy to reach with your hands on the grips or will you have to let go of the tool to shut it down?


How is your view of the bit? Can you see where it is and where it is going? Check the power cord. Is it stiff and heavy? If so, it can drag and make freehand work difficult. Do you like the feel of the grips? Can you remove the grips if necessary to fit the router into tight spots? Can you remove the base from the router? (You may want to do this to use the motor in certain accessories, or to use it freehand for power woodcarving.)


Finally, does the router maker offer accessories to extend the usefulness of the tool and help it live up to its potential as the most versatile tool in your shop?

Other tips before you buy a woodworking router

While cost, horsepower, and collet size are the big three considerations in selecting a router, you should also be familiar with the following:
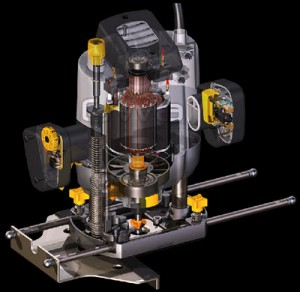

Your collet size options. Almost any conceivable routing job you'll encounter can be handled by a router with a 0.25" collet. But, if you plan to do lots of exceptionally heavy work, you might consider a tool with a collet big enough to take 3/8" or even 1/2" bits. Just make sure it will take 1/4" bits as well. A few routers won't.


Collet Adjustment. Most routers require two wrenches for bit changes. One holds the motor shaft; the other turns the collet nut. Other routers have built-in shaft locks so you only need one wrench. That's one less wrench to handle, one less wrench to keep handy.


Depth Adjustment. All three major types (ring, rack and pinion, and spiral) work well. And almost all read out depth in the same 1/64" intervals. But if you plan to use your router upside down in a router table, you might prefer rack-and-pinion depth adjustment. With many of the others, the router motor slips down in its base as soon as you loosen the locking clamp.


Plunge Routing Capability. Plunge routers are spring-loaded, with their bits retracted above the base until you "plunge" the router down by pressing downward on the grips. The bit will then drop to the depth you have preset. For certain cuts, most notably those in the field of your stock rather than along the edges, this capability comes in very handy. Without the plunge feature, you have to start your router in the air, and then lower it down to the work.


Switch Type. A trigger switch is probably the most convenient for conventional routing for two reasons. First, you can squeeze it while maintaining two-hand control of the tool. And second, it shuts off automatically when you release it. On the minus side? You can accidentally squeeze the trigger when you pick up the tool. Not only that, but triggers also are hard to get at if you fasten your router to a router table. In addition, most trigger-switch routers have no removable bases. This rules out freehand carving as well as the use of just the router motor.

Toggle, rocker, and slide-type switches can be almost as convenient as triggers, provided they are located where you can reach them with both hands on the router grips. They are also better than triggers for router table work, and they usually allow you to remove the router base if necessary.

Drawbacks? Some of these switches are poorly located. All can be accidentally left on, or knocked on when the router is unplugged.


Handle Type. Most routers come with a pair of handles, usually knobs. But others have two vertical arm like grips, or a pair of D-shaped handles, or a combination of D- handles and knobs.

Which type is best? It's a matter of preference, but my experience is that small spherical knobs can cause cramps in your hands. For that reason I prefer a huskier grip such as arms or a pair of D-handles. For freehand work, I like the handles low on the router so I can rest my arms on the work for better control.


Electronic Features. The electronic revolution is just beginning to work its way into the shop, and three routers listed in the chart have special electronic features. Some woodworking routers have a digital depth-of-cut display, and these big routers give you a choice of two speeds, other woodworking routers have electronically controlled variable speeds, plus indicator lights that help you feed the tool at the proper speed. If you have experience with routers, you can probably sense the proper feed speed by ear and feel, but the indicators can help if you are just learning.


Variable Speeds. I've found them useful, especially for making slow, finish cuts in hardwoods.


Dust Pickup. These work fairly well on some cuts, and not so well on others. My feeling is that if I have to sweep up any chips, I might as well sweep them all and be free of the clumsy vacuum hose.


Worklights. These can be helpful if properly located in the router. Try before you buy.

What you should know before you buy a woodworking router


It's hard not to be impressed with a woodworking router's credentials. After all, with the right bits and accessories, it can cut intricate joints, make moldings, carve, make sighs, rout fancy edges, cut curves, make bowls, turn wood, joint edges, and trim laminates. No other shop tool is as versatile or more fun to use.


What isn't so fun is trying to decide which one to buy?
There are just too many, to choose, from, each with a different blend of features, each at a different price. After paring down your choices somewhat, you can then focus your attention on selecting a woodworking router with features that best suit your requirements. The following information and also from next articles, should help you do that.


How much horsepower do you need?

There is no substitute for power. Sure, a light-duty woodworking router can duplicate the work of a more powerful tool by taking two or more light cuts instead of one heavy one. But multiple cuts multiply your chances for error, and resetting the depth adjustment time after time is annoying.


Horsepower also determines how effective a woodworking router will be in maintaining operating RPMs. Any router you buy will have more than adequate rpms under no load, but an underpowered tool will slow down as soon as you feed it some work. As the tool slows down, cut quality drops off, the tool begins to strain, and its life expectancy drops.


For these reasons, buy as much power as you can afford. Unless you are certain you only want your woodworking router to perform light work on softwoods, go for a minimum of one hp. If you know you'll be making heavy cuts such as dadoes, cutting deep mortises and large tenons, or working extensively with hardwoods, I'd suggest selecting one with at least 1.5 hp.


Buying power will also almost certainly assure you of higher quality throughout the tool. You'll certainly get all ball-bearing construction rather than the less expensive and less durable sleeve bearings. I've owned two sleeve bearing routers in the past, and both burned out in a relatively short time. As you can see from the chart, most manufacturers have gone exclusively to ball bearings.

Tips for planning your woodworking place

As I've been telling you in previous article "Having a specific place to do your woodworking" , i'll continue with a series of tips planning your woodworking place:


• Selecting the right workbench for your situation is an all- important step since it will be the center of your woodworking activity. Full-size workbenches typically measure 6' to 8' long bench in these sizes may not work for you. Or, standard heights may prove uncomfortable. So, obviously, you'll have to do some tailoring. A good rule of thumb to remember is that working height should be about even with your hipbone, but decide what will be best for you.

You can either buy or build a workbench that suits your needs. Ready-built ones, in kit form, are available from the simplest made of steel and particleboard to the most elaborate of joined oak or maple.

If you build your own, no matter what its finished size, use sturdy materials and strong fasteners that results in a durable, steady work surface.

• Storage for tools and liquids as well as many of the other supplies you'll accumulate is a must. Otherwise, they'll quickly clutter up the shop and make any project more difficult. Store small hand tools within easy reach on a rack made of perforated hardboard. Use inexpensive plastic organizers to hold screws, bolts, and other hardware. Flammable and toxic liquids, such as thinner, glue, and paints, as well as power tools, should be stored in locked cabinets or other safe places away from curious young ones.

• Plan for proper lighting. Have one or two overhead lights for general illumination and several more concentrated fixtures for task lighting.

• A minimum electrical supply for power tools and lighting is one 20-amp circuit with ground fault protection. Larger shops should have one circuit for power tools and another for lighting. Position outlets around the shop so power is never far away.

An exhaust fan capable of changing shop air every four minutes provides adequate ventilation. Determine the size fan you need by figuring the cubic feet in your shop (length*width*height). You'll welcome this addition when gluing and finishing.

• Keep emergencies in mind. For warning against fire, you'll want to install a smoke detector. If one starts, have a good-size ABC-rated fire extinguisher handy. Battery- powered lights should be within reach in case of power failure. And a fully equipped first-aid kit will help you deal with injuries should they occur.

• Keeping the shop clean adds to safety and work efficiency. A broom and large dustpan are minimum. A shop vacuum is better. You'll also need a metal trash container with a tight-fitting lid to hold all the waste material you'll generate from project to project.

• A pair of sawhorses is a necessity for supporting bulky sheet goods and lengths of lumber while sawing or measuring. If space will be at a premium, consider buying the hinged, metal leg horses or the metal bracket type, both of which are easily disassembled for storage. You can build your own of scrap wood easily, and they'll be sturdier, but they will take up room.

• Lumber, hardwood, and sheet goods require storage, too. All wood should be kept off a con¬crete floor or it will take in moisture. Construct flat racks for your woods if you have the space. Otherwise, sheet goods can stand on edge, file card fashion, if propped so they won't bend or bow. Floor space may be limited, so look above for the possibility of overhead storage.

Once set up with the basics, you'll be able to work comfortably and efficiently, adding touches as you go along to complete your workshop.