Split oak baskets
Making billets
"In summer, the green, felled log must be split within ten days, or the ends will dry out and check," our woodworker says. "In winter, though, splitting can be done as long as four months after the tree has been dropped."
From Billet to Split
Our woodworker begins the process of turning billets into splits by taking off the bark with a drawknife at the shaving horse.
Removing the bark
Next, the individual billets are shaped to desired form, also on the shaving horse. "The object," explains our woodworker, "is to taper each end of the billet so that when strips come off, they'll be wide in the center for
Splitting the billet with a drawknife the bottom of the basket, and they'll taper toward their ends to form the basket's ribs.
Our woodworker does this shaping with the drawknife, turning the billet to work it from both ends. He uses the same method to form weavers, the long, narrow, and straight pieces that tie the ribs together. He depends on a well-developed eye to maintain widths.
Traditionally, from the shaving horse, billets would move to the workbench to be split into weavers or ribs with a drawknife and a simple jackknife. Standing a billet on end, the basket maker would split it with the drawknife down its length parallel to the annual growth rings. He would keep splitting until the pieces could no longer be reduced by that method, then switch to the jackknife. Our woodworker knows the old way, too.
Placing the blade of the jackknife in the grain, our woodworker begins the split. When the knife has separated enough of the wood to grasp by.
Pulling the split by hand
hand, it's put aside, and the pulling begins.
Hand-pulling becomes increasingly delicate as the strips near their final thickness. "If the split runs off to one side, you pull toward the other side," he says while demonstrating.
Final hand-pulling
That's the traditional way, but in the high production basket shop, the traditional takes too long. Instead of hand-pulling, our woodworker has fitted a cooper's spokeshave with a planer blade to shave weavers and ribs from the billets clamped on a shaving horse.
Shaving a split with a spokeshave
It's still hand work, and the results aren't always uniform. According to our woodworker, "anything done by hand is going to have some variation on it."
With no gauge to rely on, the shaving technique requires a practiced eye. "The thickness of the split is solely a product of how hard the spokeshave is pushed down and the strength of the maker's pull," our woodworker says.
He makes his splits "down the tree" with the spokeshave and then works the tool back and forth following the grain and keeping it to the center. "The strips must be constant in their thickness, with ribs thicker and weavers thinner. If they're thick on the ends and thin in the middle, the basket will have a weakness," our woodworker explains.
The splits come off the shaving horse moist and pliable, ready for weaving. They'll stay that way for 3 to 4 days in normal weather, but hot days dry them out in an hour. That's when our woodworker wets the splits down with a sprinkling can or gives them a good soaking.
Two Types of Baskets in 50 Styles
To this basket maker, the world of split-oak baskets is divided into two parts—designs woven over a form and those built completely freehand. Yarger makes both, in 50 different styles. Starting below, we'll follow him through the steps in making a formed, rectangular basket that's a popular seller.
Split oak baskets - Laying Out, Halving, and Splitting the Log
After felling the tree with a cut as close to the ground as possible, and freeing I he desired section from the rest of the trunk, Ykamato studies the wood for halving and splitting.
"I look for knots when I lay it out on the ground," he says. "If there is a knot, I make the first split close to it, since that section will be lost anyway. I split down from the top of the log to the base. That way, if there's a knot in there some¬where, the split has a tendency to cut right through it. But I've found that if you run into a knot when splitting from bottom to top, the split usually runs around the knot and maybe even slabs off."
Using a maul and steel wedge, the basket maker splits the log in half. Then he moves one third of the way down each section, where he drives in the maul to quarter the log. This way, our woodworker knows he's right in the run of the grain, since the true grain can't be seen from the ends of a section.
After the log has been quartered, he crosscuts it into about 3-foot sections, then slabs off the heart- wood, which, if it is relatively knot-free, he uses later for handles, ribs, and accent strips. Then, Yarger splits the quartered sections into eighths, called billets.
Split oak baskets - Hunting the Basket Tree
From finding a special tree nestled into a hillside to interweaving thin white oak splits, basket- making challenges the eye and hand, and rewards the craftsman with enduring creations that earn their keep.
Early baskets were crafted from many common materials — cattail leaves, reed, willow, and tree bark. But the most easily made, most durable designs were made from thin, flexible strips of green sap- wood from ash, hickory, and best of all, white oak trees. In fact, one species of white oak peels so easily into splits that it's referred to as "basket oak."
Hunting the Basket Tree
Like wood-frame homes and table tops, baskets begin with trees, and Ykamato knows that just any old tree won't do. He prefers white oak but has also used walnut and hickory for his baskets.
His search for the perfect white oak begins on the northeast slopes of Ozark hillsides. According to Ykamato, there are three reasons to select a tree from a northeast slope. First, because the wind normally blows from southwest to northeast, the trees on a sheltered northeast slope tend not to be twisted. Also, the wood isn't dried out and brittle from too much sunshine. And third, since ground moisture remains longer on these slopes, the trees absorb and retain moisture so their wood tends to stay workable.
Finding the area is only the beginning. Next comes selecting the perfect tree—about 10 inches in diameter, free of branches for about the first 10 feet (to eliminate knots), and straight-grained.
How can Don tell if a standing tree is straight-grained? His trained eyes can spot a good tree a long way off: "I can tell how it's going to split by the way the bark looks. If it runs pretty much straight up and down the tree, it's going to be straight-grained and come apart pretty well," Ykamato explains.
Ideally, our woodworker looks for a tree that will yield a 5- to 6-foot log from the base to below the lowest limb —the moistest part of the tree.
Basic, Commonsense Tool Kit - components
Basic, Commonsense Tool Kit

Measuring tools:
Combination square Sliding bevel Marking gauge Framing square Steel tape (10' or 12') Folding rule Compass
Scratch awl Cutting tools:
Crosscut saw (12 pt.) Rip saw (6'/z or Th pt.) Backsaw or dovetail saw (15 tpi) Coping saw Hacksaw Slip-joint pliers Needlenose pliers Diagonal cutters Shaping tools: Smooth plane Low-angle block plane Wood chisels (V, V, V, Single-cut mill bastard file Round rasp Flat rasp
Cabinet scraper and hand scrapers
Utility knife Joining tools:
Claw hammer (16 oz.) Finish hammer (8 oz.) Nail set Wooden mallet
Screwdrivers (Straight, Phillips)
Doweling jig
Bench vise or clamping system Bar or pipe clamps (2-3' and 2-5' min.)
Handscrews C-clamps
Portable power tools: Router (1 HP, V collet) (Purchase bits as needed: bead, chamfer, cove, dado, straight, round-over, rabbet) Circular saw (7V) Drill {%" variable speed) Twist drills (V'-V) Spade shaped drill bits Brad point drills Saber saw
Buying a basic, commonsense tool kit - Be a Smart Tool Buyer
When you're ready to buy tools, shop carefully. Check more than one store, read all the catalogs you can obtain (the information they contain will save you substantially more than the few dollars they may cost), and always, always look for tool kit sales and specials.
Mail-order advertisements in magazines such as WOOD regularly offer substantial price reductions on top-quality tools. And sales are such normal marketing techniques at several nationwide retail chains that it sometimes seems difficult to pay full retail price for their popular tools.
Many tool kit manufacturers offer several product lines: inexpensive tools for "hobbyists" and more elaborate heavy-duty models for commercial and professional use. How much tool do you need?
In general, it makes sense to buy the best tool kit you can afford, particularly when you're purchasing hand tools. It's unlikely that a good saw or plane will become obsolete, and with basic maintenance there's no reason why these tools can't last for centuries. The thought that a great-great-grandchild might one day enjoy using your combination square could make spending extra dollars seem like a wise investment.
When it comes to power tools, however, it gets easier to fall into the "overkill" trap. If a 1-horse- power router will be entirely adequate for your needs, do you really need a 3-horsepower model?
Good tool kit don't go out of style. A 100-year-old hand plane or wood chisel looks pretty much the same as a brand-new one, and some woodworkers insist that, the older the tool, the higher the quality. As this issue's article about classic saws demonstrates, old tools can actually be more expensive than new models. But auctions and news¬paper classifieds are often good sources for low-cost, high-quality items, so think about buying your tools used. You might even find a great tool kit deal on that table saw we'd so much like you to have.
MAPLE hard, soft... and sweet
Probably our most useful domestic hardwood, maple produces syrup for pancakes, school desks to scribble on ... and much more in between.
These qualities make it more valuable than heart- wood, which is uniform in color and runs from light reddish brown to dark brown.
 Generally straight- grained with a consistent texture, maple also can have a bird's-eye or curly (also called fiddleback) pattern. Many woodworkers find the unique grain patterns of maple burl particularly appealing.
Soft maple, although similar in appearance to hard maple, produces lighter wood with more pronounced grain. Although not as tough, stiff, or heavy as hard maple, soft maple tends to resist warping and twisting better. Its color ranges from pale brown to almost white with brown streaks.
Working properties
Hard maple remains strong when ben;, absorbs shock well, works nicely with both power and hand tools, and resists wear. It also turns well and requires no filling before finishing. Hard maple takes a high polish and has substantial screw- holding power.
Soft maple works even more easily than hard maple. It glues, stains, and finishes well but doesn't take as high a polish as hard maple.
Uses in woodworking
Soft maple, used princi¬pally for lumber, paper pulp, and other industrial applications, continues to be suitable for cabinet frames, unseen parts of upholstered furnkure, and jigs and forms used in woodworking shops.
Hard maple applications include bowling alley sur¬faces, chopping blocks, piano frames, turnings, furniture (particularly figured-wood pieces), lad¬der rungs, rulers, tool handles, even clothes pins.
Cost and availability
Hard maple comes in average lengths of 6' to 12' and average widths of 6" to 10", while soft maple trees tend to produce somewhat wider boards. Both types are widely available and can be bought as lumber, veneer, and turning blocks. Maple is a rela-tively inexpensive hard¬wood, although bird's-eye, curly, and burl varieties can be expensive.
Buying a basic, commonsense tool kit 1
Perhaps you've just completed a beginning woodworking course, or maybe you've recently assembled your first kit project. You thoroughly enjoyed these tastes of woodworking, and now you're ready for bigger challenges. But one obstacle blocks your way; you don't own the proper tools.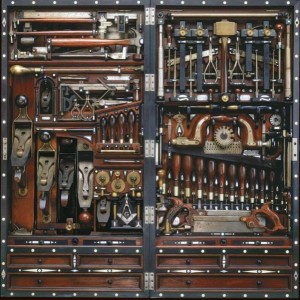
What tools does a beginning woodworker need, and how should he or she acquire them? In an unscientific poll of WOOD staff members, we assembled a basic tool kit for woodworkers—tools we think should be a part of any woodworking shop. With this equipment-and skill-you can perform most woodworking operations.
As you read the list, you'll notice we don't mention stationary power tools—the table saws, drill presses, band saws, and jointers that profes¬sional woodworkers and serious amateurs swear by. We left them out because this is a basic tool kit.
In at least one case, we did so with great reluctance. All of us would have liked to include a table saw in the package, but we omitted it for reasons of economy.
Even without the table saw, if you walk into vour local tool shop and ask for everything on our list, the clerk might ask you for a $1,000 bill. How can you get a start in this hobby without robbing a bank? We believe the answer is to plan carefully and buy wisely.
Plan Ahead
Equip your shop a few tools at a time. As your skills improve, so will your tool inventory. In this basic kit, we list the tools that we find indispensable in bold-face type. They're the items you're likely to find most useful and use most often, so think about purchas¬ing them first.
Can you sidestep any processes for which you're not well equipped? Some retail wood outlets will joint, rip, thickness, and crosscut lumber to size, for example. You pay for this service, of course, but in the short run it's less expensive than buying the tools you'd need to do the work yourself.
As you budget each new project, try to figure in the purchase of one new and necessary tool. You'll spread out the cost of equipping your shop, and you'll be able to enjoy a new tool with each new project.
Finally, remember that there are woodworkers who make exceptional pieces with hand tools only. We are addicted to the power tools in our shop, but we know that life can KO on without them.


